Homemade Protein Pudding Recipe: Budget-Friendly High-Protein Dessert
Protein pudding seems expensive when you see those tiny cups at the store for $3 each, doesn’t it?
What if I told you that making your own creamy, satisfying protein pudding costs less than $1.50 per serving and takes just 5 minutes of actual work?
- Homemade Protein Pudding Recipe: Budget-Friendly High-Protein Dessert
- KEY INFO
- Total Cost: $3.00–$6.00 for entire batch (serves 4) Cost Per Portion: $0.75–$1.50
- Cost Breakdown Per Serving:
- Prep Time: 5 minutes Cook Time: 0 minutes Chill Time: 30-60 minutes Total Time: 35-70 minutes Servings: 4 generous portions Difficulty: Very Easy Price Level: Very Inexpensive
- Dietary Tags: Vegetarian, Can be made gluten-free, dairy-free, keto, or vegan
- EQUIPMENT NEEDED
- INGREDIENTS
- METHOD
- CRUCIAL TIPS
- STORAGE & VARIATIONS
As someone who’s been helping people eat healthier on a budget through EatHealthier.co.uk, I’ve perfected this recipe that delivers restaurant-quality results without the premium price tag.

KEY INFO
Total Cost: $3.00–$6.00 for entire batch (serves 4)
Cost Per Portion: $0.75–$1.50
Cost Per Portion: $0.75–$1.50
Cost Breakdown Per Serving:
- Greek yogurt: $0.40
- Protein powder: $0.50–$0.80
- Cocoa powder: $0.05
- Sweetener: $0.15
- Optional avocado: $0.20
Prep Time: 5 minutes
Cook Time: 0 minutes
Chill Time: 30-60 minutes
Total Time: 35-70 minutes
Servings: 4 generous portions
Difficulty: Very Easy
Price Level: Very Inexpensive
Cook Time: 0 minutes
Chill Time: 30-60 minutes
Total Time: 35-70 minutes
Servings: 4 generous portions
Difficulty: Very Easy
Price Level: Very Inexpensive
Dietary Tags: Vegetarian, Can be made gluten-free, dairy-free, keto, or vegan
EQUIPMENT NEEDED
Essential Tools:
- Large mixing bowl
- Whisk or wooden spoon
- Measuring cups and spoons
- 4 serving containers or mason jars
For Best Results:
- Blender or food processor (creates silky-smooth texture)
Budget Alternatives:
- Hand whisk instead of blender (texture will be slightly less smooth)
- Any small containers instead of fancy ramekins
- Regular measuring spoons work fine instead of digital scale

INGREDIENTS
Main Components:
- 2 cups (500g) Greek yogurt or cottage cheese (dairy-free yogurt for vegan)
- 1/4 cup (30g) protein powder (any flavor – vanilla, chocolate, or unflavored)
- 1/4 cup (25g) unsweetened cocoa powder (carob powder for caffeine-free)
- 2-3 tablespoons maple syrup or honey (stevia or erythritol for sugar-free)
- 1/4 teaspoon salt
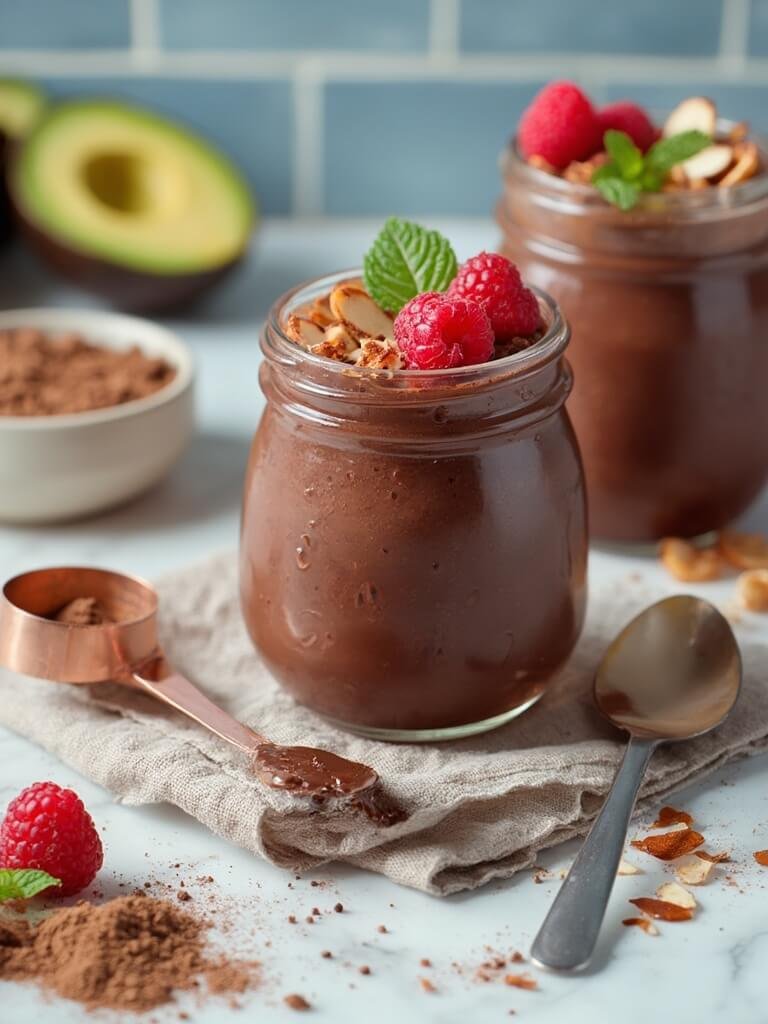
- 1 small ripe avocado, optional (adds incredible creaminess)
Flavor Enhancers:
- 1 teaspoon vanilla extract
- 1/2 teaspoon ground cinnamon (optional)
- 1/4 teaspoon espresso powder (enhances chocolate flavor)
Optional Toppings:
- Fresh berries or banana slices
- Chopped nuts or seeds
- Dark chocolate shavings
- Coconut flakes

METHOD
- Add all main ingredients to your blender or large mixing bowl.
Start with yogurt, then protein powder, cocoa powder, sweetener, and salt. - Blend for 60-90 seconds until completely smooth.
If using a bowl and whisk, whisk vigorously for 2-3 minutes until no lumps remain. - Taste and adjust sweetness or chocolate intensity.
Add more sweetener if needed, or extra cocoa powder for deeper chocolate flavor. - Check consistency – it should coat the back of a spoon.
If too thick, add 1-2 tablespoons milk or water. If too thin, add more yogurt. - Divide mixture into 4 serving containers.
Mason jars work perfectly and make portion control easy. - Chill for at least 30 minutes for best pudding-like texture.
The longer it chills, the thicker it becomes. - Add toppings just before serving.
This prevents soggy toppings and maintains the best texture.

CRUCIAL TIPS
Money-Saving Tips:
- Buy protein powder in bulk during sales – it keeps for months
- Use cottage cheese instead of Greek yogurt to cut costs by 30%
- Frozen berries cost half the price of fresh and work perfectly as toppings
- Make double batches – the per-serving cost drops even more
Success Secrets:
- Room temperature ingredients blend more easily – take yogurt out 15 minutes before making
- Sift cocoa powder if it’s clumpy to avoid lumps in your pudding
- Taste as you go – protein powders vary in sweetness dramatically
Common Mistakes to Avoid:
- Don’t skip the salt – it enhances all the other flavors
- Never add hot liquid to yogurt-based pudding – it’ll curdle
- Don’t over-blend if using cottage cheese – 60 seconds maximum

STORAGE & VARIATIONS
Storage Instructions:
Store covered in refrigerator for up to 4 days.
If pudding thickens too much, stir in 1-2 tablespoons of milk before serving.
Scaling Tips:
This recipe doubles perfectly for meal prep.
Half the recipe works great for 1-2 servings.
Delicious Variations:
- Peanut Butter Chocolate: Add 2 tablespoons natural peanut butter
- Vanilla Berry: Skip cocoa, use vanilla protein, fold in fresh berries
- Mocha: Add 1 teaspoon instant coffee powder
- Tropical: Use coconut yogurt and add shredded coconut
- Keto-Friendly: Use sugar-free sweetener and add extra healthy fats
Make It Vegan:
- Replace Greek yogurt with thick coconut yogurt or silken tofu
- Use plant-based protein powder
- Substitute maple syrup for honey
The beauty of homemade protein pudding lies in its flexibility and your wallet will thank you.
At under $1.50 per serving, you’re getting more protein than most expensive protein bars while satisfying your dessert cravings.
I’ve been making this recipe for three years now, and it never gets old.
The creamy texture rivals any store-bought version, and knowing exactly what goes into my food gives me peace of mind that’s worth more than the money saved.
Your protein pudding is ready when it holds its shape on a spoon and tastes rich and satisfying.
Trust me – once you try this homemade version, you’ll never go back to overpriced store-bought containers again.